Contents:
UPDATE 10/3/16: A new post on using the UZ7HO Soundmodem with Winlink Express ( Link )
UPDATE 8/3/16: W2YG has discontinued support for AGW Express. The UZ7HO interface is now supported by Winlink.
A copy of AGW Express is attached to this post. No support is offered for the AGW Express except for this post.
Thanks to W2YG‘s efforts we now have a program that creates everything you need to run WinLink 2000 (WL2K) using a soundcard eliminating the need for a TNC. Installing W2YG’s AGW Express Interface also installs all of the required programs to run RMS Express through a soundcard. Each of the installed programs will need a little tweaking. This is all described below.
This tutorial is now complete.
Click on the AGW Express Icon on your desktop and and the entire RMS Express Soundcard system will load.
You will be asked if you wish to load RMS Express at this time. Click YES to load it and start your RMS Express e-mail client. If you click no RMS Express will not load but can be loaded at anytime by clicking the RMS Icon on your desktop.
The AGW Express system will be loaded into your Taskbar.
W2YG’s tutorials and videos, on the download page, are excellent, look them over.
Software:
Download W2YG’s AGW Express Interface ( here ).
Click AGW Express Interface Under Application.
Run the app when it is downloaded, follow the instructions.
…
Hardware:
Wire a 2M radio into your soundcard interface just as you would an HF rig for PSK.
Set the radio on 145.050 MHz.
…
Desktop
When AGW Express is loaded it will place icons for the 4 programs into the hidden system tray. You may find it easier to move these from the ‘hidden’ area down onto the visible system try. if you do the next time you run RMS Express the 4 icons will be visible and easier to access.
AGW Express system map:
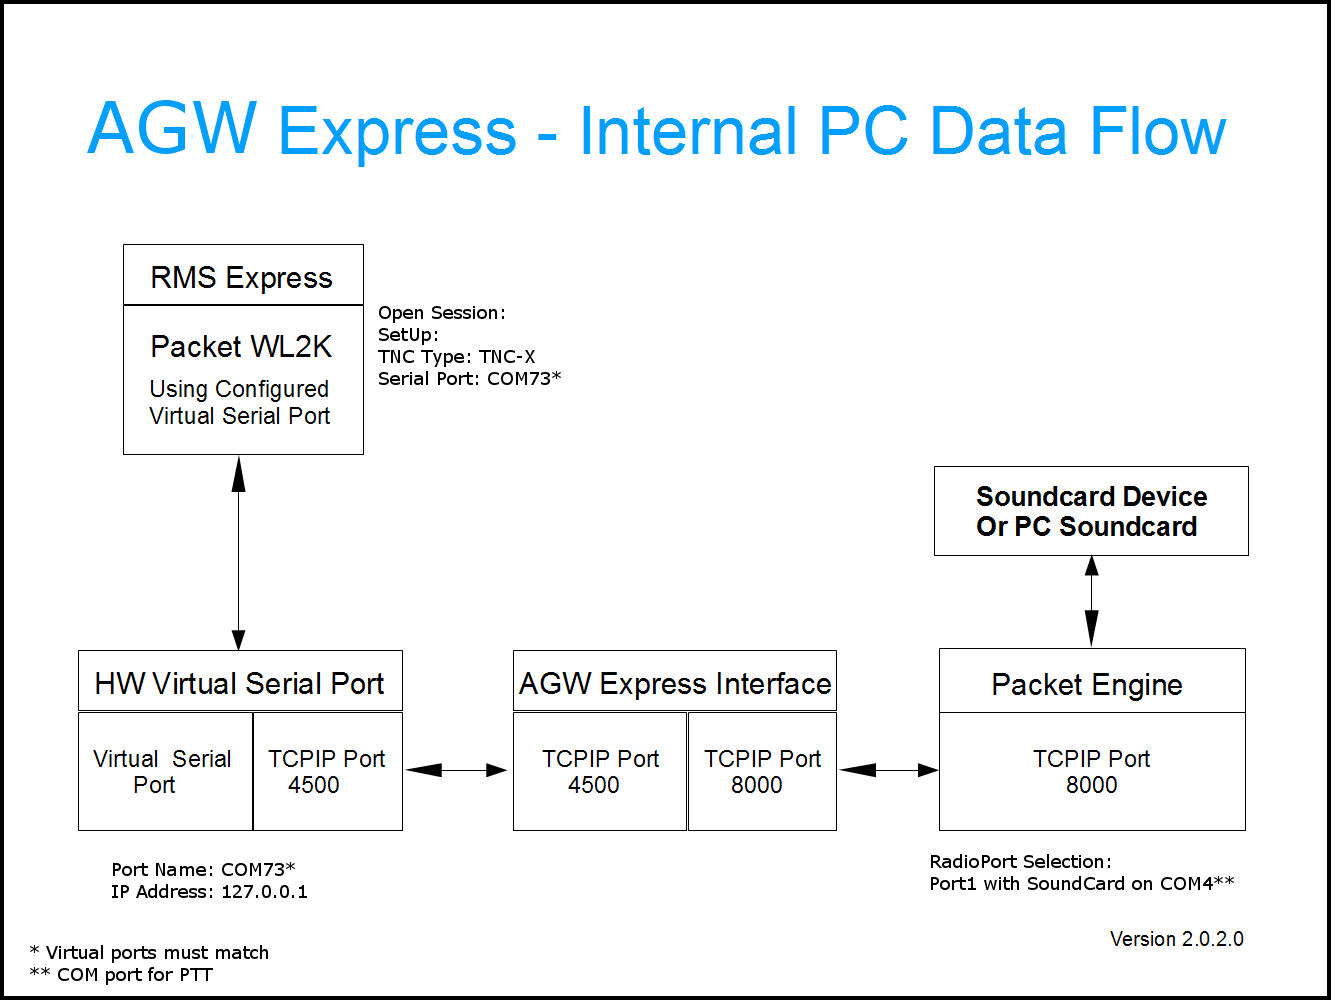
Let’s go through each of the 4 programs:

This is your e-mail client. use this program to create, send, receive and read WL2K e-mails. It connects to a WL2K Gateway over the air (2M). RMS Express is covered in the RMS Express Tutorial Post. Here we will cover what needs to be set for AGW Express:
- On the main page Open Session: should say ‘Packet WL2K‘
- Click Open Session: to open a Session.
- Correctly configured the session should display:*** Starting WL2K packet session…
*** Initializing TNC-X; port COM73; 9600 baud
*** Initialization complete
*** Ready - Connection Type: Direct [N4SER-10]
- Note this will change to Digipeater [N4SER-10] via [N4SER] once the digipeater is operational.
- SetUp:
- Packet TNC Type: TNC-X
- Serial Port: COM73
- This must match the virtual com port set in HW Virtual Serial Port
- Serial Baud Rate: 9600
- TNC Parameters: Have the 1200 Baud column clicked.
- Correctly configured the session should display:*** Starting WL2K packet session…

RMS Express must talk to a serial port! So we create a virtual port. This is not the port you set up for yur sound card inte4rface (the PTT port) we will get to that. This is a internal port to allow RMS Express to send and receive e-mails.
- Access by right clicking the HW Virtual Port Icon on the right side of the task bar.
- In the Virtual Serial Port tab:
- Port NameL COM73 (note this must match the com port set in RMS Express)
- Port: 4500 (note: this must match the TC{ Port in AGW Express)

AGW Express is the program that ties this all together. Use to load /unload everything. and to make sure everything is set correctly.
Right Click the system tray icon:
- Settings It should look like this. (with your call sign and any changes you made to the ‘standard’ setup.)
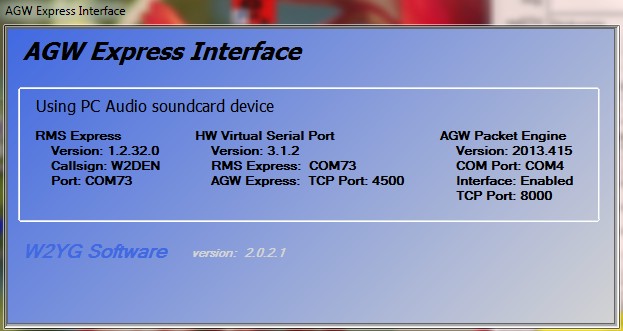
- Change Packet Engine
- AGW Packet Engine
- Change Soundcard Device
- PC Audio (or similar)
- Change Virtual Serial Port
- COM73 (if that is what RMS Express and HW Virtual Serial Port are set to)

The AGW Packet Engine (AGWPE) AGWPE Home page is a very versatile tool with many functions. We will cover what is needed to make AGW Express operational. Other functions are topics for other posts!
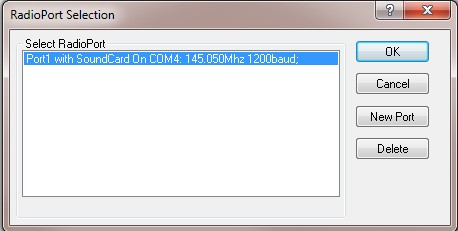
Right Click the system tray icon:
- Properties
- This will list the available ports.
- Highlight the port you are using
- [ Port1 with SoundCard on COM4: WL2K RMS Soundcard ] or similar…
- click [OK] to access the port edit screen.
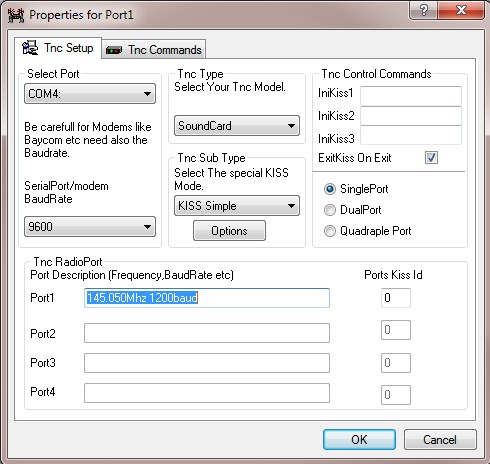
- TNC Setup:
- Select Port: should be pointing the the port used by your soundcard to radio interface.This will key the rig.
- Tnc Type: SoundCard
- Tnc RadioPort:
- Type in a description i.e. ‘145.050 1200 Baud’
- Port1 Ports Kiss Id: [0] This is the name that shows up on the Available Ports List above
- SinglePort.
- TNC Control Commands
- check: Kiss On Exit
- check: Kiss On Exit
- Select Port: should be pointing the the port used by your soundcard to radio interface.This will key the rig.
- TNC Commands:
- Set the baud rate fory your station, most likely 1200.
- Adjust things here, I’m learning so can’t help much.
- TCPIP Over Radio SetUp: Thank’s NO TCPIP… and tha’s it
- StartUp Programs: MT
- Setup Interfaces:
- WinSock Interface
- Enable Winsock TCP/IP Application Interface
- SetUp; TCP; 8000
- This is the port AGW Exp is talking to.
- WinSock Interface
Here’s what it should look like:
Right Click on the toolbar icon the click Properties:
There may be other ports listed here
Highlight the Port you just created and click OK. The Properties for Port 1 should look like this:

You will also get one, or more, of the AGWPE port icons in your system tray, one for each AGWPE port. These are informational, no user properties. Hovering over them will show you which ports are open and activity on that port.
AGW PE will not load, returns an error:
It is not uncommon for the AGW PE ini file to get corrupted. This is the file that holds the Ports information.
To remedy you must delete the ini file from the AGW PE folder and then recreate the port as described above (Link).
This tutorial is complete. More troubleshooting may be added and it will be updated as needed.
Your comments are welcome.