 UPDATED 09/17/21.
DRA units can now accept direct PTT from Fldigi and UZ7HO
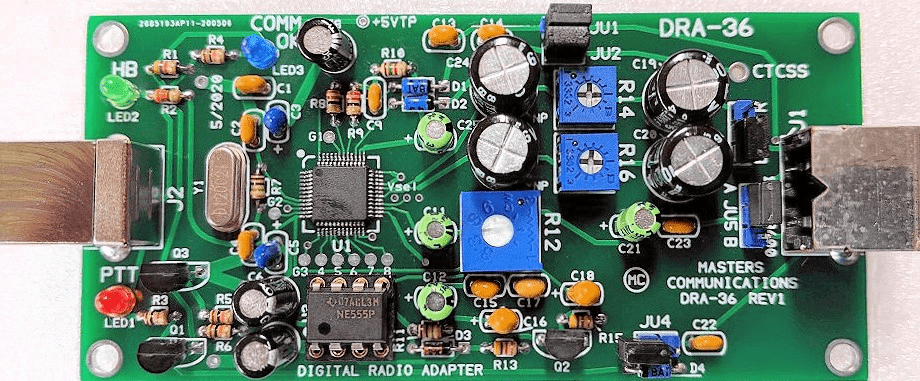
The Masters Communications DRA-36 ( https://www.masterscommunications.com/ ) is a high speed broad bandwidth substitute for a Signalink or home-brew sound-card interface. This Digital Radio Adapter (DRA) is designed to operate at 9600 baud on the VHF and UHF bands thus requiring a radio capable of that speed in order to fully realize the increased throughput. The DRA will work just fine at 1200 baud for older radios without 9600 baud capability but you will not benefit from the highest possible throughput. The DRA also works in the HF bands with Fldigi etc. with the right software to manage the PTT, more on this below.
Like the Signalink, the DRA-36 comes with a built in very high quality sound-card (C-Media CM119A) and attaches to your computer via a USB port. The radio side is a 6 pin mini DIN wired to be compatible with current 6 pin mini DIN radio ports. The DRA is designed for use with Winlink’s VARA FM with the latest high speed version of the software.
The DRA-36 is available as a kit or preassembled. The kit does require good soldering skills, a very fine point iron, small diameter (0.5 or 0.6 mm) solder and a good magnifying headset in order to work with the small lands on the board. The surface mount sound-chip comes presoldered to the board. The instructions are not quite up to Heathkit standards but easy enough to follow. The unit / kit comes with a USB cable. You will need to purchase a 6 pin mini DIN male to male cable to connect to your radio.
References:
- VARA FM AND WINLINK SETUP GUIDE A very comprehensive guide to setting up your DRA-36.
- Fldigi C-media setup instructions: The ‘new’ way to set up Fldigi and a DRA. this page may become obsolete, Wearch the title to find the latest.
- UZ7HO set up for a DRA: This is the Winlink page on the newest set up instructions for Winlink using the UZ7HO software modem.
Setup:
- Plug the SDR into your radio and into a USB port on your computer.
- Open Winlink Express then a VARA FM session.
- The session setup is the same as any other sound-card interface.
- VARA FM Settings:
- VARA Setup:
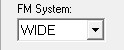
- FM System should be WIDE (NARROW here for Signalink type interfaces). be sure that JU5 is on the “B” side for 9600 baud. The DRA will automatically slow down to 1200 to accommodate slow connections.
- Sound-Card

- Pick the USB PnP Sound Device.
- The DRA’s sound card can be confirmed by unplugging the DRA, the correct sound-card will disappear from the list.
- The #’2′ may be different for your install.
- PTT: RA-Board-2
- You may need to try both -1 and -2 to see which one the DRA is using. 2 worked for me..
- Pick the USB PnP Sound Device.
- PTT
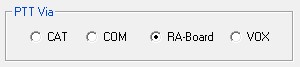
- PTT set to RA-Board.
- VARA Setup:
Tuning
- RX Level
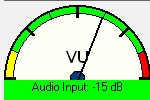
- Monitor an clear channel with no activity, no squelce
- The VARA VU meter should read in the green, ideally about 1 o’clock on the dial.
- Adjust the RX level pot (R12) so the meter is at 1 o’clock.
- TX Level
- In VARA FM click Settings, and the select Sound Card from Menu. The SoundCard window will open up.
- Tune your radio to the frequency of a node which you expect will have a good RF signal to your location.
- SAR-19 here in Sarasota.
- Step one:
- Tune a second radio to the same frequency to listen to you signal.
- Click the Red Tune button.
- Adjust the transmit pot (R14 or R16 depending on the position of JU3) until the tone, heard in the second radio is just below the level of a normal voice transmission.
- Click the Tune button to turn off the transmitter.
- Step two:
- Click the RED auto-tune button on the right side of the SoundCard window.
- Enter the node callsign in the callsign box (N4SER), then click the electrical plug icon to the right.
- Your radio should key up and will send 11 transmissions with increasing tone levels.
- At the end of the 11th transmission the gateway node will respond.
- Two numbers will be displayed in your SoundCard Window –
- a Signal to noise value, which is hopefully in the high 20’s or low 30’s ie: “27dB SNR”
- your transmit audio level setting, which is automatically adjusted. On my radios it runs between -4dB and -12dB.
- Your done… enjoy!
Using the DRA with Fldigi and other Winlink modes
Using the DRA series with Fldigi and the UZ7HO soundcard modem used to require additional programs and creating a batch file to make the startup automated. This has been greatly simplified by changes to Fldigi, at least from version 4.1.19 onward and the UZ7HO ptt-dll.
Fldigi
Refer to the reference above for more details. This will work with almost every DRA interface. Disable the built in VOX for this to work on units with VOX.
- Click Configure / Config Dialog / Soundcard / Devices
- Set the Capture and Playback to the appropriate USB PnP Sound Devices

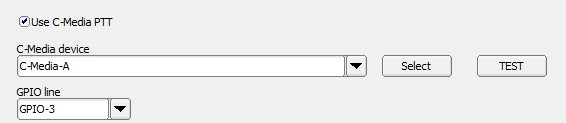
- In the Config Dialog click on Rig Control / C-Media PTT
- Check Use C-Media PTT
- Pick the correct C-Media device
- The GPIO line most likely is GPIO-3
- Click Select
- The TEST button will key the rig multiple using the DRA PTT. The DRA red light should flash and your rig should key accordingly. Be sure it is on an available frequency.
- That’s it for Fldigi.
UZ7HO
- Download and unzip the ptt-dll.zip from the UZ7HO site into the folder containing your UZ7HO.exe program.
- In UZ7HO open Settings / Devices.
- Under PTT Port pick EXT in the Select PTT port drop down.
- Click Advanced PTT settings.
- Select USB PnP Sound Device in the Device drop down.
- Click Apply.
- The TEST button will key your rig and the red PTT LED will light up on the DRA
- That’s it. No more complicated BAT files etc.
- You’re welcome.
Everything from this point onward is obsolete, for reference only
The PTT circuit in the DRA-36 requires some special handling by the controlling application; the RA-Board choice in VARA-FM. Fldigi and other sound-card modes such as Winlink Packet do not yet have this capability. The following describes how to work around this and get Fldigi etc. to work with you DRA.
To begin read this article and work you way through it. ( Link ). You can get everything to work with what is in the article. I will add some hints to help you along.
Here are some hints to make this work.
com0com
- When installed this program will run every time you open Windows.
- Note the two com port numbers. You will need these later. You can also find them in the Device Manager under Ports (COM & LPT).
The HID Device: VID and PID
- Plug the DRA-36 into a USB port and confirm the green light is on.
- This can be the most confusing part of the setup.
- Open the Device Manager
- Expand the Human Interfaces Devices.
- There will be one or more USB Input Device in the list.
- for each one;
- Right click then click Properties
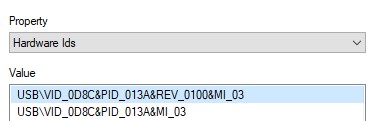
- In the Details tab select Hardware IDS in the drop down Property list.
- You need to confirm that one of them looks like this:
- It is the VID_0D8C and PID_013A that you are looking to confirm.
- You can check this by unplugging the DRA-36 and this entry should be gone from the USB Input Devices
- Right click then click Properties
From here you can follow the page referenced above.
- Open the CAT7200 program
- Under Application Port Select either of the ports you created in com0com.
- Under CAT Port select CM108
- Enter d8c for the VID (Hex)
- and 13a for the PID (Hex)
- These are the number you confirmed in the Device manager.
- Close CAT7200
- Open FlDigi
- in the Configure Dialog
- In Soundcard Devices pick the USB PNP Sound Device for the Port Audio
- In Right Channel pick Modem signal on left and right channels.
- In Rig control hardware PTT
- Check Use separate serial port for PTT
- Check Use RTS.
- Under Device, select the COM port that is the pair of the COM port selected under CAT7200.
- Click Initialize, then Save and Close.
- in the Configure Dialog
You are all set up.
Running Fldidgi with a DRA-36
- Start CAT7200
- com0com should be running from the computer startup
- This can be confirmed in the Device Manager under Ports(COM & LPT)
- Start Fldidgi
Batch File
- At the end of the reference The referenced article is a good desciption on how the set up a batch file to run Fldigi and CAT7200
Optional step, use a Windows Batch file to start CAT7200, open the ports, startfldigi, and then close CAT7200 when fldigi closes.
With Notepad or similar editor, create a batch file called fldigiStart.bat (or whatever name you like). The file should look like this, adjust the file name locations to reflect where you saved CAT7200:
-
- @echo off
- REM Start CAT7200 and fldigi
- REM Edit the folder locations if you stored the programs in a folder other than C:\Ham
- REM Save this file to the desktop, and just double click it to run, or better yet
- REM save the file to a folder (like C:\Ham), then create a desktop shortcut that points to this file.REM You can then change the shortcut properties to run minimized, and
- REM also change the icon, browse to the C:\Program Files (x86)\fldigifolder and select the fldigi.exe file for the program icon.
- start “CAT7200” “C:\Ham\CAT7200\cat7200.exe” START
- start /wait “fldigi” “C:\Program Files (x86)\Fldigi-3.23.21\fldigi.exe”
- taskkill /im cat7200.exe
- exit
Create a new shortcut to this file on your desktop. Edit the shortcut properties and set it to start minimized, then change the icon to point to the fldigiicon in “C:\Program Files (x86)\Fldigi-3.23.21\fldigi.exe”. This batch file will start CAT7200, open the port, then start fldigi. When fldigiis closed, CAT7200 will close as well.
Operating Multiple Copies of FlDigi
You may find the need to run Fldigi with different configurations for your HF and UHF operations. This can can be accomplished using the command line options. Everything you need to know is here: ( Link ). This can be part ot the batch file(s) you created to run Fldigi with your DRA-36.
here is my batch file :
@echo on
REM Start CAT7200 and fldigi
REM Edit the folder locations if you stored the programs in a folder other than C:\Ham
REM Save this file to the desktop, and just double click it to run, or better yet
REM save the file to a folder (like C:\Ham), then create a desktop shortcut that points to this file.
REM You can then change the shortcut properties to run minimized, and
REM also change the icon, browse to the C:\Program Files (x86)\fldigifolder and select the fldigi.exe file for the program icon.
start /MIN “CAT7200” “C:\Ham\CAT7200\cat7200.exe” START
START /wait “fldigi” “C:\Ham\Fldigi\fldigi.exe” –flmsg-dir “C:\users\den\flmsgNBEMS.files” –config-dir “c:\Users\Den\fldigiNBEMS.files”
taskkill /im cat7200.exe
exit
Running UZ7HO with your DRA-36
You can use a very similar batch file to run UZ7HO so you can send Packet through you DRA-36. here is my batch file to do that:
@echo on
REM Start CAT7200 and fldigi
REM Edit the folder locations if you stored the programs in a folder other than C:\Ham
REM Save this file to the desktop, and just double click it to run, or better yet
REM save the file to a folder (like C:\Ham), then create a desktop shortcut that points to this file.
REM You can then change the shortcut properties to run minimized, and
REM also change the icon, browse to the C:\Program Files (x86)\fldigifolder and select the fldigi.exe file for the program icon.
start /MIN “CAT7200” “C:\Ham\CAT7200\cat7200.exe” START
START /wait “uz7ho” “C:\Ham\UZ7HO Soundmodem95\soundmodem.exe”
taskkill /im cat7200.exe
exit
SHORTCUTS
Put you batch files somewhere safe in your computer and create shortcuts to access them from you desktop.