 A close friend gave me a Raspberry Pi 3 (RPi) he picked up at Dayton knowing I like to hack. I’ve always wanted one but was hesitant with some reports that it just wasn’t powerful enough to handle much in the way of amateur radio applications.The ‘new’ 3 version has changed that and turned this single board computer into a very viable machine.
My first thoughts were to pair it up with my newly acquired Elecraft KX3 for some digital communications.
The project took off when I found the work done by Ed Valasek, K3HTK at the IndyHam web site ( Link ). His script makes this pretty painless. This post is just a walk through on how to use his script. So, thank you Ed. Go over and check out the IndyHam site.
There are three steps:.
- Getting the RPi operational
- Installing FlDigi
- Interfacing the RPi to the Kx3
- AND More!
Here’s how I did did it:
Getting the RPi Operational
The RPi is sold without an operating system or any type of input / output so you will need:
- USB Keyboard and mouse.
- A monitor with HDMI or DVI input.
- 5 v 2amp micro USB power supply.
- Micro SD card with an operating system installed.
- USB Soundcard.
- USB Hub: powered or unpowered, needs enough room for the USB Soundcard. Can also use a USB extension jumper.
Let’s take these one at a time:
* USB Keyboard and mouse
Almost any USB keyboard and mouse will work. A keyboard with a built in USB hub will save you one of the RPi’s USB ports (it has 4) but isn’t required. Only a separate keyboard / mouse has been tested.
* RPi micro USB power supply
A 2.5 amp 5 vdc supply is recommended. The Pi will run on less, try a cell phone charger…
A good source for RPi hardware is Adafruit.com.
* HDMI or DVI Monitor
The RPi outputs composite video and HDMI. Lets start with HDMI. If you have an HDMI ready monitor (or TV) just connect it with an HDMI cable to the RPi and you are all set. If you have a monitor with DVI input you can purchase an HDMI to DVI cable to go between the RPi and your monitor. Note: There are a number of DVI interface configurations (DVI-I, DVI-D etc.) make sure your cable is compatible with your monitor’s input.
* Micro SD card
Now we get serious.
The RPi has no operating system. The OS image is loaded from a micro SD card. You will need an 8 to 32 GB micro SD card with Raspbian loaded on it. Instructions are here. I recommend you install the full Raspbian image rather than NOOBS.
I tested this with a 16 GB card formatted as FAT32 with SD Formatter on a Win 7 machine and imaged it with Win32DiskImager.
* USB Soundcard
The RPi only has audio output so a soundcard is needed. There are a pile of cheap USB soundcards. You do not need anything fancy. I am using the SYBA SD-CM-UAUD USB Stereo Audio Adapter. Ed Valasek (K3HTK), more on Ed later, is using the Sabrent AU-MMSA.
The RPi/s USB ports are too close together to accept a sound card USB adapter so you will need a hub or a USB extension.
Installing the card is a simple as plugging it into the RPi, via a hub or extension.
Confirm the soundcard has been installed by typing the following into the terminal: lsusb
Something to the order of “C-Media …” should show up on the list, along with all your other USB devices.
You can make your new USB soundcard the default RPi audio input and output if you want. There are lots of tutorials on the web. Fo now you can leave it as the secondary audio device, the built in the primary. Will set FlDigi to point to the USB soundcard.
OK, check off #1, almost …
* Updates
If you loaded the Raspbian operating system then let’s do some updates.
Open the terminal and cut and paste, or type if your good at that stuff:
sudo apt-get update
then:
sudo apt-get dist-upgradeHelp on this is here.
Now we’re done, the RPi is ready!
Installing FlDigi
At this time there does not appear to be a Raspbian distro for FlDigi. I’ve tried walking through all the steps as described on a couple of sites without success. If you too have gone that route I strongly suggest you reformat your SD card, reload Raspbian and start again.
The easiest and simplest way to get FlDigi onto the RPi is to use Ed Valasek (K3HTK)’s script. It does everything from download FlDigi through compiling it for Raspbian. It is available on the Indy Ham web site ( Here ) The only disadvantage that I see is it only covers FlDigi and not the auxiliary programs. Ed says when he gets time he will add some of the other apps. Something I will look into as well.
NOTE: this script does install Hamlib so you can control most rigs directly from FlDigi if you configure FlDigi’s rig control to use Hamlib and pick your transceiver’s rig description file.
* Running K3HTK’s Script
Open Ed’s page in the RPi web browser. ( I assume you can get the RPi to connect to the internet) and download the script. It should end up in the pi/Downloads folder. This is accessible via the file manager, the file cabinet icon in the top apps bar. The script is called pi3-fldigi-setup.sh.
- Copy, or move, this file into the pi folder.
- Open the Terminal program ( monitor icon).
- Make the script executable by typing : sudo chmod +x pi3-fldigi-setup.sh
- Now execute the script: sudo ./pi3-fldigi-setup.sh
- As Ed says, sit back and watch it happen, and it will happen for quite some time, perhaps an hour.
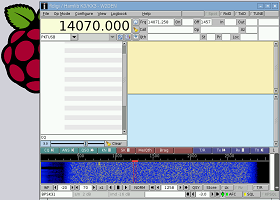
You should now have the FlDigi on your RPi desktop. Congratulations.
* Configuring FlDigi
Starting FlDigi for the first time brings you to the Operator Configuration window. You will need to fill in your call sign, the rest is optional.
We’ll configure the rig control in the next section when we connect the Kx3 to the RPi.
I’ll leave the rest for you to configure as you please.
Interfacing the RPi to the Kx3
Here’s where the fun begins. I use homebrewed soundcard to rig interfaces based ‘s KK7UQ’s interface, so will be going that route here. If someone works all this out with a different interface, such as a Signalink I will gladly add your instructions to this post.
The Kx3 DIY Soundcard I/O
The Kx3 could use a little oomph in the audio department, I like to have speakers and the capability for more than one set of headphones. So, a cheap pair of battery operated speakers from Parts Express, I prefer the type with batteries only in the main speaker so it can be used as a mono monitor.
The KK7QU interface was stripped down to just the audio. PTT is via the KXUSB cable. Then built the remaining parts into the main speaker. Sort of in the shape in my diagram with the three 1/8″ stereo audio jacks across the back and a volume control on each side. The fourth, ‘radio audio’ is fed from the amplifier’s main speaker output. The amp input is plugged into the Kx3’s PHONES jack.
Turn the AFX MD menu to off for mono and digital operation.
Eventually there will be three 1/8″ stereo jacks added connected to the amp output. One will switch the speakers off. A busy speaker. It will handle all my audio needs.
Sketch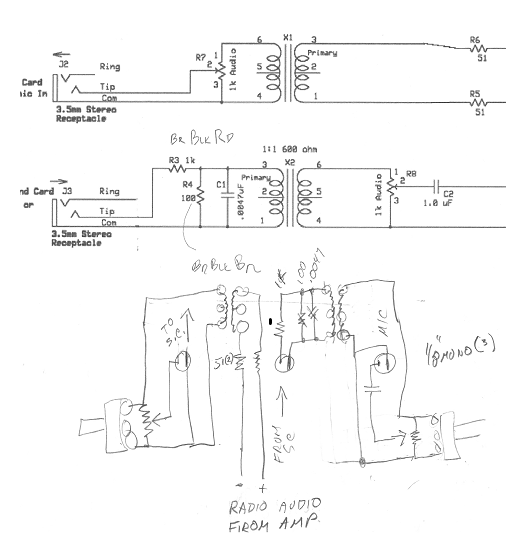
Top from KK7UQ’s schematic and my notes below. My ‘\’ are ‘done’ marks. ^Top^
Digital I/O
Plug the KSUSB into the RPi, it recognizes it, actually you’d never know. So, type lssub in the termional and the KSUSB will show up as a Device. Something like; ‘USB-Serial (UART) IC’ after the manufacture’s name. Plug the other end into the Kx3’s ACC1 jack.
That’s it the radio is one with the computer.
FlDigi Setup
I’ll only cover the audio and rig configurations, this is not another FlDigi tutorial.
Configure / Sound Card / Devices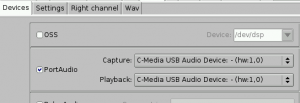
× PortAudio
Capture: ‘C-Media USB Audio Device’ or similar.
The capture may resort to blank but still appears to function correctly.
Playback ‘C-Media USB Audio Device’ or similar.
Save, then Close
Configure / Rig control / Hamlib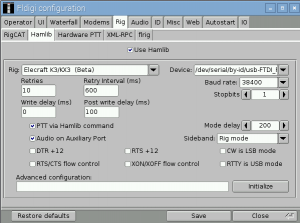
× Use Hamlib
Rig: Elecraft K3/KX3 (Beta)
Device: Pick the USB UART from above. Most likely the only choice.
The rest can stay at the defaults.
Kx3 Connections
The speaker (amplified) input connects to the PHONES jack
The interface MIC to the Kx3’s MIC jack.
Two menu settings need to be changed:
- AFX MD menu to OFF for mono and digital operation.
- MIC BTN menu to OFF if you plug in the soundcard interface.
Wrap it up
Well that just about puts you on the air. You will need to adjust the audio levels for a nice ‘waterfall’ and to light up 2-3 AFC bars on transmit. If i come up with any hints I will include them here.
And More!
FLRIG
FlRig seems to work with the RPi. It will give you more control over the rig than FlDigi and the two stay in sync.
Install with the following command in Terminal: sudo apt-get install flrig
The K3 rig works, no Kx3 in my install v 1.3.17. Pick the right Ser. Port, same one usied in FlDigi.
Enjoy!